Unity 使用 Addressables 實現熱更新
分類
說明
本篇將分享我使用 Unity Addressables 搭配 Unity Cloud Content Delivery 實現遠端熱更新,這又是一篇水很深的文章。
熱更新
熱更新是一種不用下載新版本的應用程式就能實現應用程式更新的技術,就好像網站的資料庫一樣,可即時更新網站的資料。
Unity Addressables 簡介
Addressables 套件提供了用於組織和打包應用程序內容的工具和腳本,以及用於在運行時加載和釋放資產的 API。
當您將資產設置為可尋址時,您可以使用該資產的地址從任何地方加載它。 無論該資產駐留在本地應用程序中還是內容交付網絡上,Addressable 系統都會找到並返回它。
備註
- 資產: Asset,就是 Unity 常見的 Asset 資料夾。
- 可尋址: Addressables,意思是給一個地址讓程式取得資產。
- 內容交付網絡: content delivery network,意思是雲端空間,用來存放資產的。
聲明
因為 Unity Addressables 水很深,有些觀念可能會有理解錯誤,若有錯誤的地方可聯絡我修正。
範例說明
範例主要是讓玩家可即時更新關卡,剛打開應用程式後會先預載關卡,接著示範存取關卡資料並進行遊戲。
安裝
前往選單 > Window > Package Manager

- Packages: Unity Registry
- 搜尋: Addressables
- 安裝 Addressables
Addressables Groups
Addressables Groups 就跟常見的群組功能一樣,一開始有一個 Default Group,但你也可以新增其他的 Group,每個 Addressable Asset 都會被歸類在一個 Group 之中。
位置
前往選單 > Window > Asset Management > Addressables > Groups
新增 Group

在 Addressables Groups 點擊 New > Packed Assets
Label
Label 主要是處理特殊情況的,以我目前的了解,它可以用來當作預載的識別名稱,例如:我想預載有 preload 標籤的 Assets,其他的用途尚未了解,以後有發現再分享給大家。
位置
在 Addressables Groups 的 Label 欄位底下。

將物件設定成 Addressable 並新增標籤
方法1
將 Project 的物件拖曳到某個 Addressables Group 裡面,並在 Addressables Group 的 Label 欄位設定標籤。
方法2
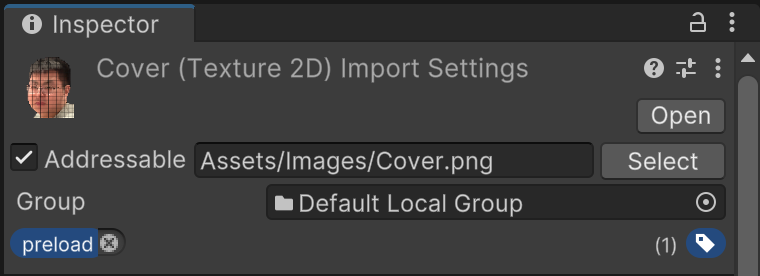
在 Inspector 勾選 Addressable,點擊膠囊圖案的標籤新增標籤,在已新增的標籤旁邊有個 x 按鈕可以刪除標籤。
預載腳本
預載是讓使用者可以先下載資源,之後玩遊戲時不用一邊下載一邊等待。
此腳本是參考官方文件 Get progress updates 稍微修改後的版本。
PreloadWithProgress.cs
using System.Collections;
using UnityEngine.AddressableAssets;
using UnityEngine.Events;
using UnityEngine.ResourceManagement.AsyncOperations;
using UnityEngine;

/// <summary>
/// 預載 Addressables 資源
/// </summary>
internal class PreloadWithProgress : MonoBehaviour
{
    /// <summary>
    /// 下載處理操作
    /// </summary>
    private AsyncOperationHandle downloadHandle;

    /// <summary>
    /// 下載完成事件
    /// </summary>
    public UnityEvent<bool> CompletionEvent;

    /// <summary>
    /// 進度事件
    /// </summary>
    public UnityEvent<float> ProgressEvent;

    /// <summary>
    /// 預載標籤
    /// </summary>
    public string preloadLabel = "preload";

    IEnumerator Start()
    {
        downloadHandle = Addressables.DownloadDependenciesAsync(preloadLabel, false);
        float progress = 0;

        while (downloadHandle.Status == AsyncOperationStatus.None)
        {
            float percentageComplete = downloadHandle.GetDownloadStatus().Percent;

            // Report at most every 10% or so
            if (percentageComplete > progress * 1.1)
            {
                // More accurate %
                progress = percentageComplete;
                ProgressEvent.Invoke(progress);
            }

            yield return null;
        }
        progress = 1;
        ProgressEvent.Invoke(progress);
        CompletionEvent.Invoke(downloadHandle.Status == AsyncOperationStatus.Succeeded);
        // Release the operation handle
        Addressables.Release(downloadHandle);
    }
}
新增空物件,添加此腳本組件即可。
你會看到 Completion Event 和 Progress Event 這兩個事件,你可以將進度條的進度更新方法加在 Progress Event,將完成後要調用的方法加在 Completion Event。
關於進度條的功能已經超出本篇內容,有興趣的讀者可以參考 Unity 簡易血條製作,血條也可以當作進度條來用。
載入 Addressable 資源
Unity 提供許多方法來載入 Addressable 資源,我會使用同步的方式來載入,實際上官方會建議使用非同步的方式載入資源,這樣才不會讓遊戲卡住。
同步載入
我是參考 Synchronous loading example。
void Start()
{
    //Basic use case of forcing a synchronous load of a GameObject
    var op = Addressables.LoadAssetAsync<GameObject>("myGameObjectKey");
    GameObject go = op.WaitForCompletion();

    //Do work...

    Addressables.Release(op);
}
沒錯,我只用這兩招就完成載入關卡功能了,但也是因為我的功能較為單純。
如果你想查看其他的載入方式,我推薦參考偵錯桐人寫的 [Unity] Addressable v1.16.19 常用語法整理。
Profiles
Profiles 是用來設定 Addressables 建置和載入的位置,建置就是生成 Addressables 資源的地方,載入位置可自訂,本範例會將資源上傳到 Unity Cloud Content Delivery,所以這裡順便分享如何設定。
需要注意在建置之前要先選好 Profile,在運行應用程式時會根據當時選擇的 Profile 的路徑下載資料。
位置
前往選單 > Window > Asset Management > Addressables > Profiles
建立 Profiles
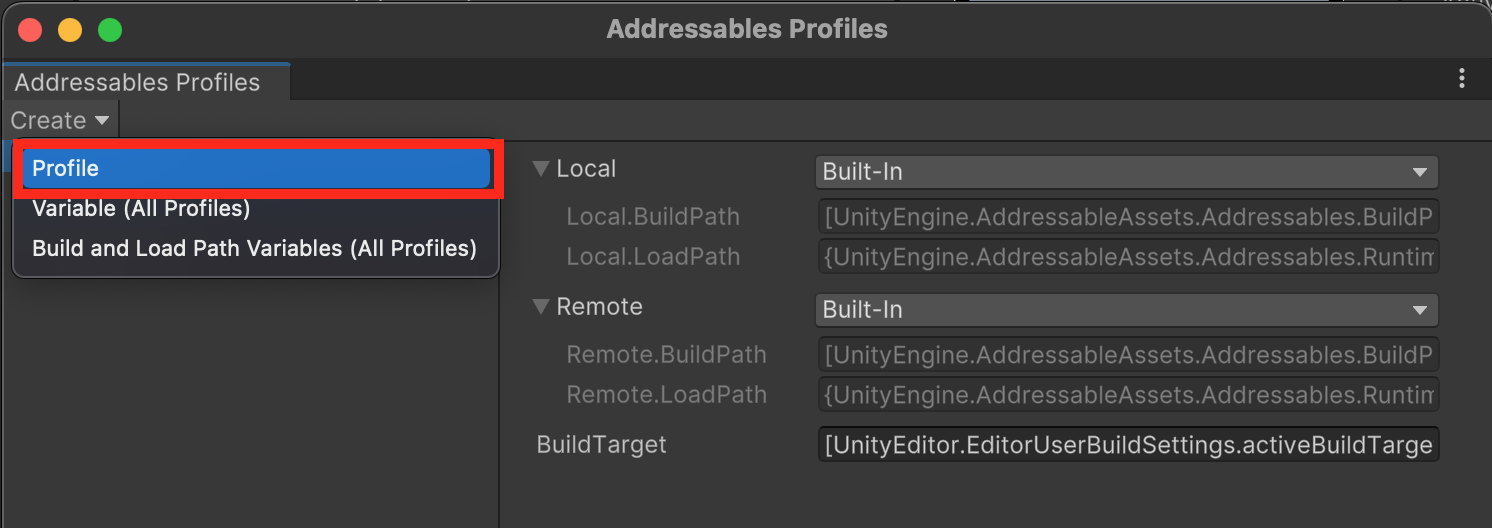
點擊 Create > Profile
設定 Remote
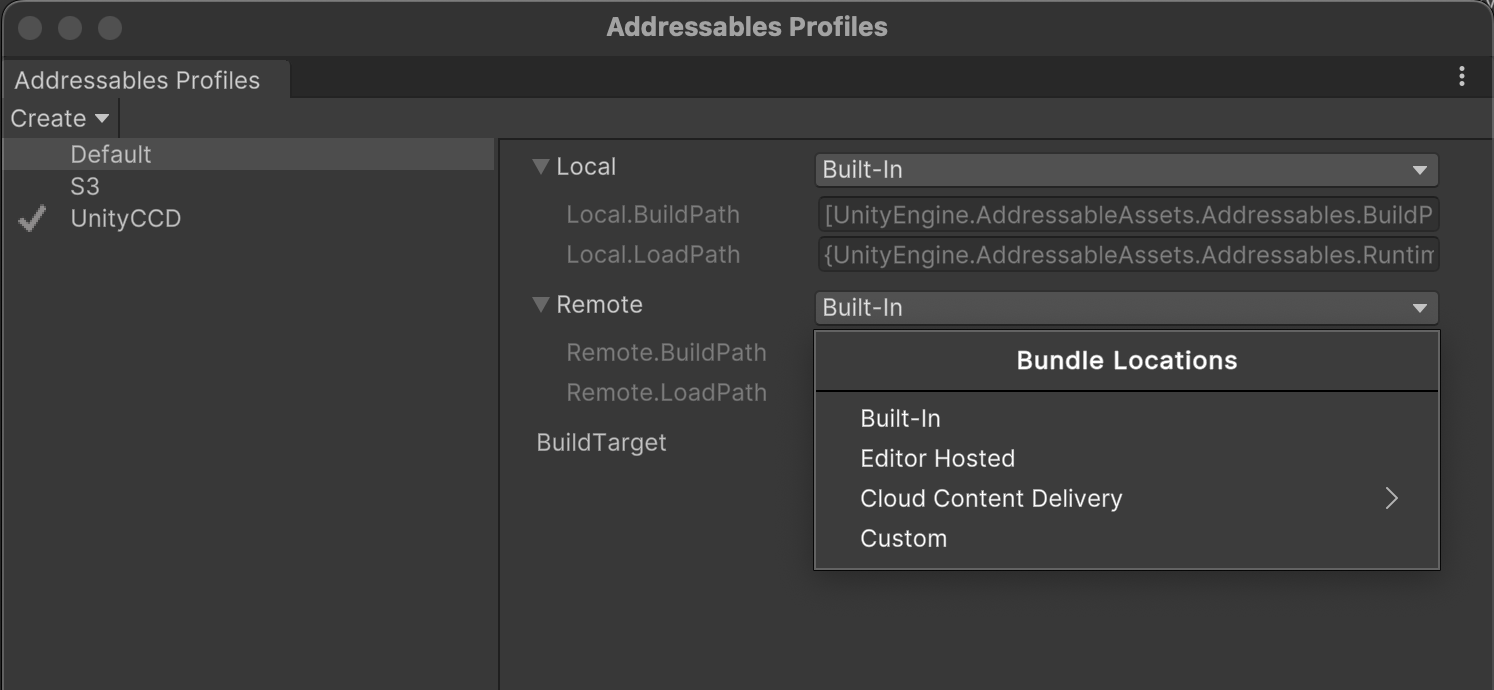
從上圖可以看到 Bundle Locations 有四個選項,這裡我們要使用的是 Cloud Content Delivery,但目前為了方便可以先使用 Built-In 就好,等 Cloud Content Delivery 設置好再回來設定。
Build
建置就是將設定成 Addressables 的資源生成 bundle 檔,讓 Unity 可以讀取,我們會將 bundle 檔以及相關所需的檔案上傳到雲端。
Build 位置

Build 設定
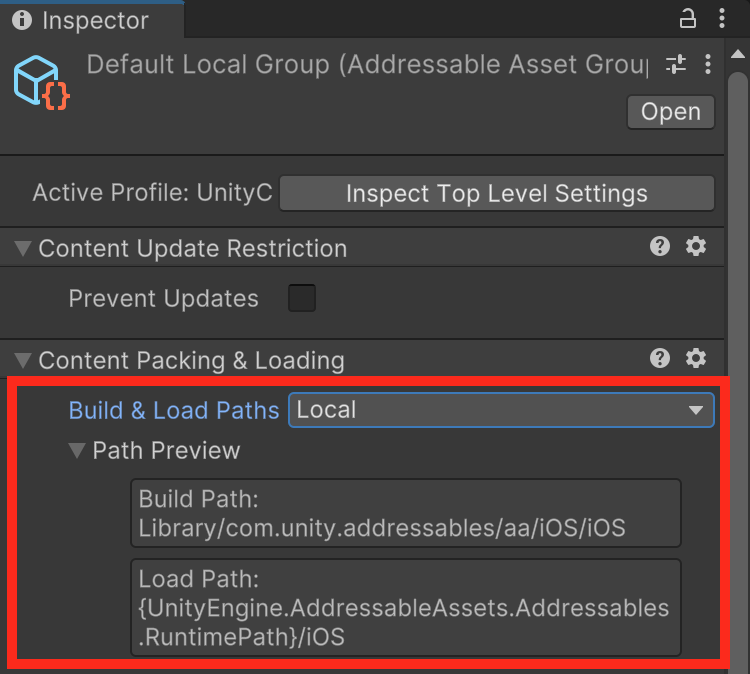
選擇任一 Group,在 Inspector 面板中,你會看到 Build & Load Paths,你可以選擇 local 或 remote,然後在 Path Preview 的 Build Path: 就是建置路徑,這是在目前專案底下的路徑。
Addressables Report
你可以在 Addressables Report 看到建置結果。
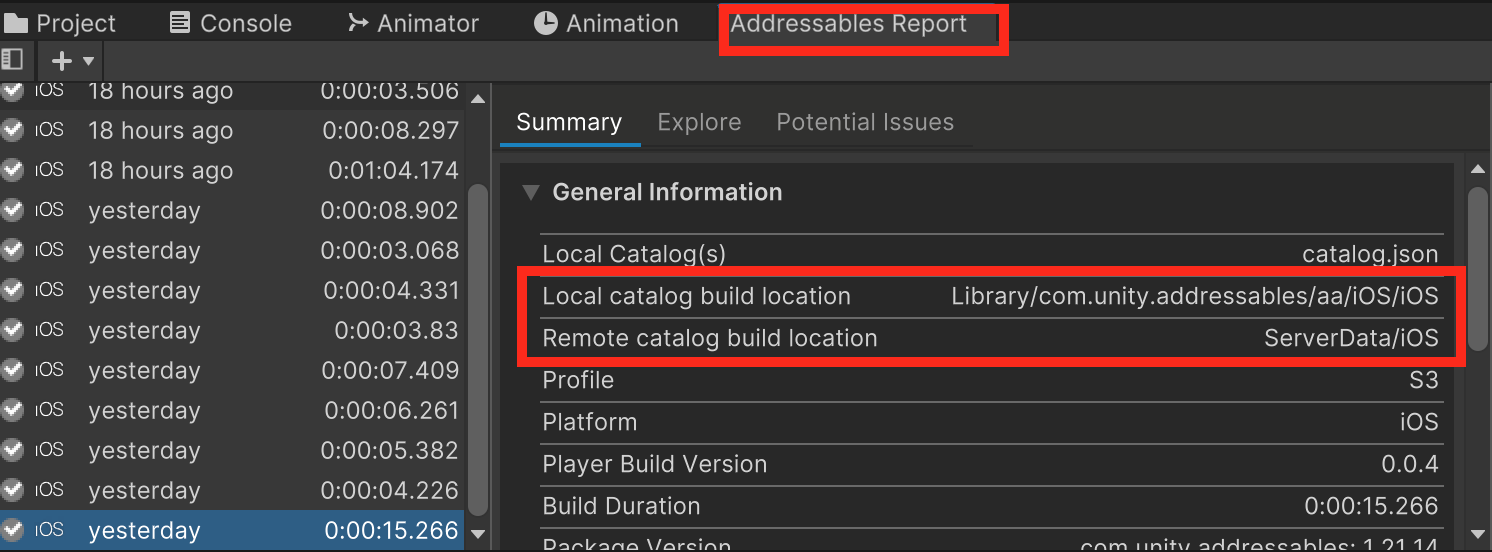
Addressables Settings
這邊只說明建置到遠端的設定
位置
前往選單 > Window > Asset Management > Addressables > Settings
遠端設定
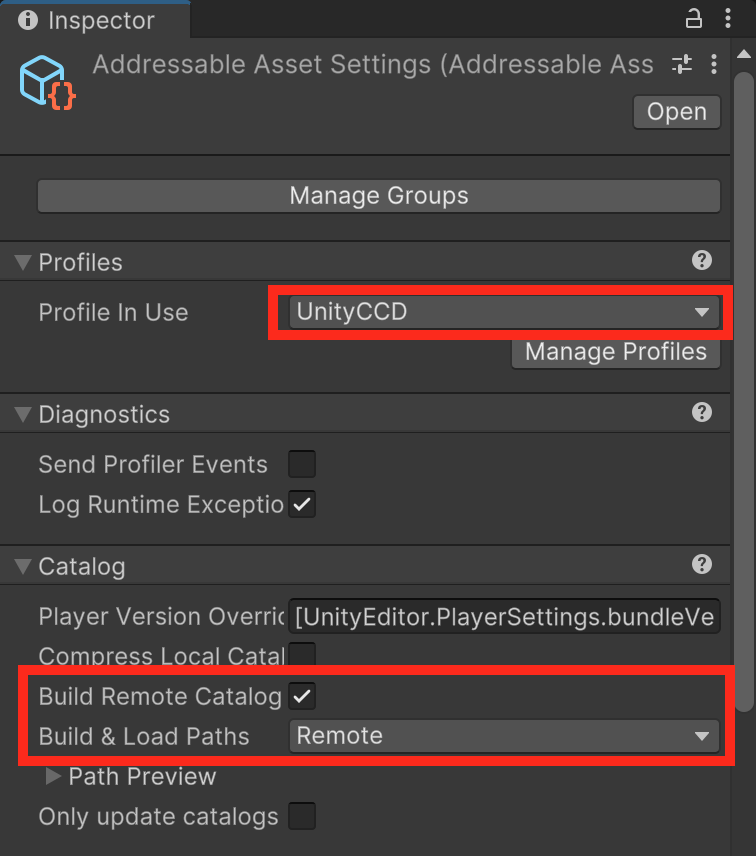
- Profile In Use: 選擇你已經設定好的 Profile
- Build Remote Catalog: 打勾
- Build & Load Paths: 選擇 Remote
Cloud Content Delivery
Cloud Content Delivery 是 Unity 雲端儲存桶,用來存放 Addressables 資源的服務,前50GB 可以免費試用。
位置
登入 Unity Dashboard,在左側選單點擊 LiveOps,在 LiveOps 選單中點擊 Cloud Content Delivery,一開始可能需要先註冊。
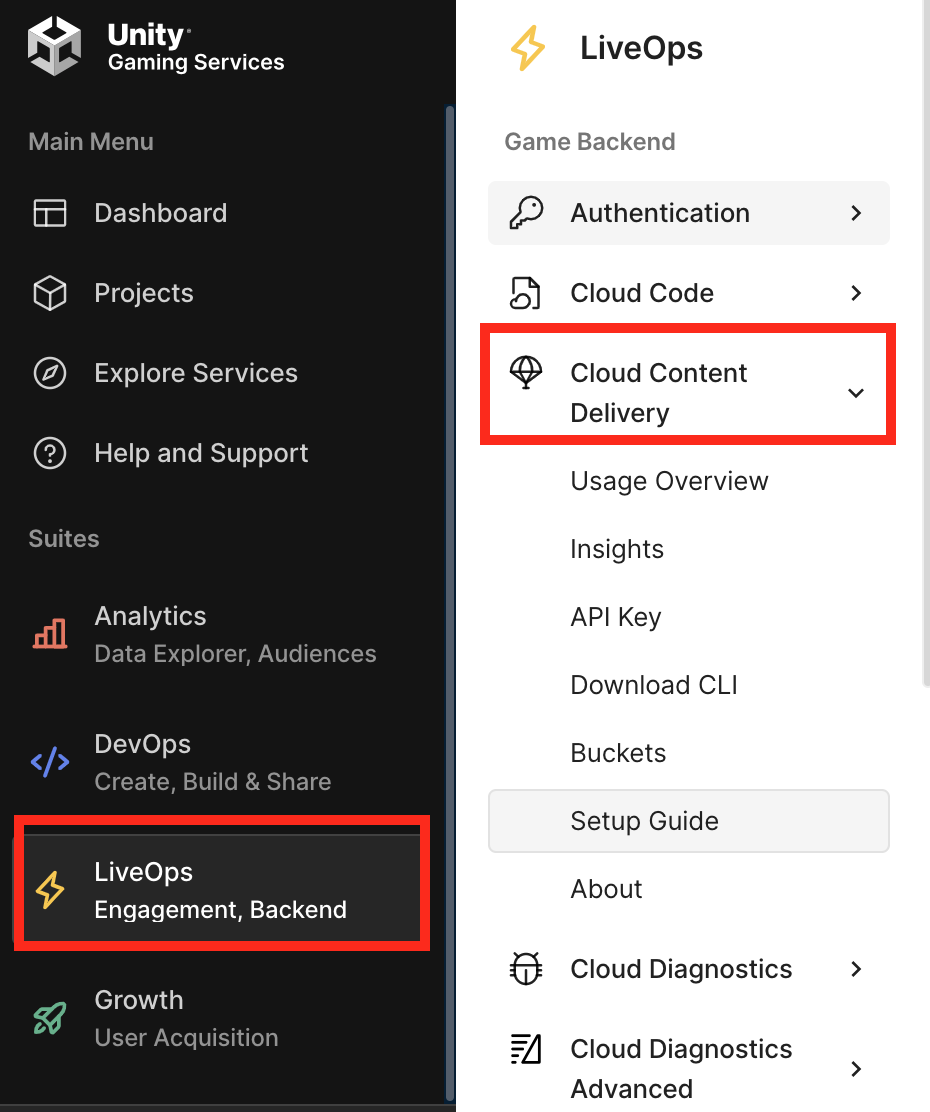
設置
一開始先按照 Setup Guide 一步一步完成設置,位置如上圖 Setup Guide。
這裡我先簡單說明一下,每個步驟。
- Manage your environments: 預設已經有一個 production 環境,但為了按照步驟練習,我新增 development 環境。
- Create buckets: 我建立 iOS bucket,因為目前我的遊戲只有 iOS 平台,你需要按造自己的需求設定。
- Upload your content: 上傳 Addressables 資源,你可以先上傳 Local 測試用。
- Create a release: 建立版本。
- Create promotion only buckets: 不太確定是什麼,可能是把這次版本的資源封裝起來,之後可以快速轉移到其他環境。
- Promote your content: 把剛剛封裝的資源轉移到其他環境。
- Run your game: 運行遊戲,之後還要回到 Unity 設定 Profiles。
最終你應該至少有一個環境,並且已經上傳一個版本用來測試。
最後 Build Remote
經過一番折騰之後,差不多可以進行最後的 Build Remote。
Profile
在 Profile 的 Remote Bundle Locations 選擇 Cloud Content Delivery,然後會有兩個選項,目前我還沒深入了解,我這裡先使用 Specify the Enviorment… 那個選項,然後選擇 production > iOS Bucket > latest Badage。
因為我是個人開發,所以我沒有測試 development 就直接往 production 看結果了。
Settings
記得選擇設置好的 Profile,和設定 Remote。
Group
在 Group 的 Build & Load Paths 選擇 Remote。
Build
接著 Build 之後,將 Build Path 裡面的檔案上傳到 Cloud Content Delivery 的 development 環境,測試確認沒問題後,再用 Promote 同步到 production 環境。
同樣我是個人開發,所以我沒在 development 確認就直接上傳到 production 環境。
注意:我遇到了一個事情,我不確定是否如同我猜測的那樣,就是 Project Settings > Player > Version 需與發佈的 App Version 一致,否則不會更新,這是我重複測試的結果。
結論
研究到這裡我已經心態炸裂陳子豪了,以上內容有些不足的部分請多包涵,希望可以幫助大家少走幾步歪路。
參考
一杯咖啡的力量,勝過千言萬語的感謝。
支持我一杯咖啡,讓我繼續創作優質內容,與您分享更多知識與樂趣!