AWS Beanstalk Django single instance active https
分類
說明
原本 Beanstalk 使用 Load Balance 監聽 443 port 就可以使用 https
但 Load Balance 費用不低,所以我把 Load Balance 關掉後發現 https 也隨之無法使用了
以下教學如何啟用 https
要做的步驟如下
- 關閉 Load Balance
- 更新 DNS 記錄
- 安裝 Certbot
- 監聽443 port
- 建立 certbot 腳本
- 開啟 certbot 腳本權限
- 建立證書更新排程
1. 關閉 Load Balance
- 進入 Elastic Beanstalk 控制台,選擇 Environment
- 選 Configuration
- Edit Capacity

Environment Type 選 Single Instance

最後滑到最下面按 Apply

2. 更新 DNS 記錄
如果你原本的網站,使用 http 可以連上的話,這個步驟可以省略
如果連不上,那就可能關掉 Load Balance 後,伺服器的網址有變
那就要更新 DNS 紀錄了,以下是更新 DNS 記錄說明
例如我是在 Hinet 網域購買 veryenjoy.tw 網域
我就登入 Hinet 網域,更新 DNS 記錄
更新大概是這樣:
主機名稱/別名: www.veryenjoy.tw
紀錄類型: CNAME
IP/主機名稱: your.elasticbeanstalk.com,你的 elastic beanstalk environment 網域
3. 安裝 Certbot
Certbot 是用來產生 ssl 憑證的工具,把這個放在 Django 專案底下讓 Beanstalk 安裝
Beanstalk 會讀 .ebextensions 資料夾底下的檔案進行配置,副檔名要設定 .config
配置會按照檔名排序執行,所以記得命名時要注意順序是否正確,以下檔名可以自行更改
只要在 .ebextensions 即可
具體安裝可參考 Certbot 官網,選擇伺服器軟體和系統,按照指示安裝。
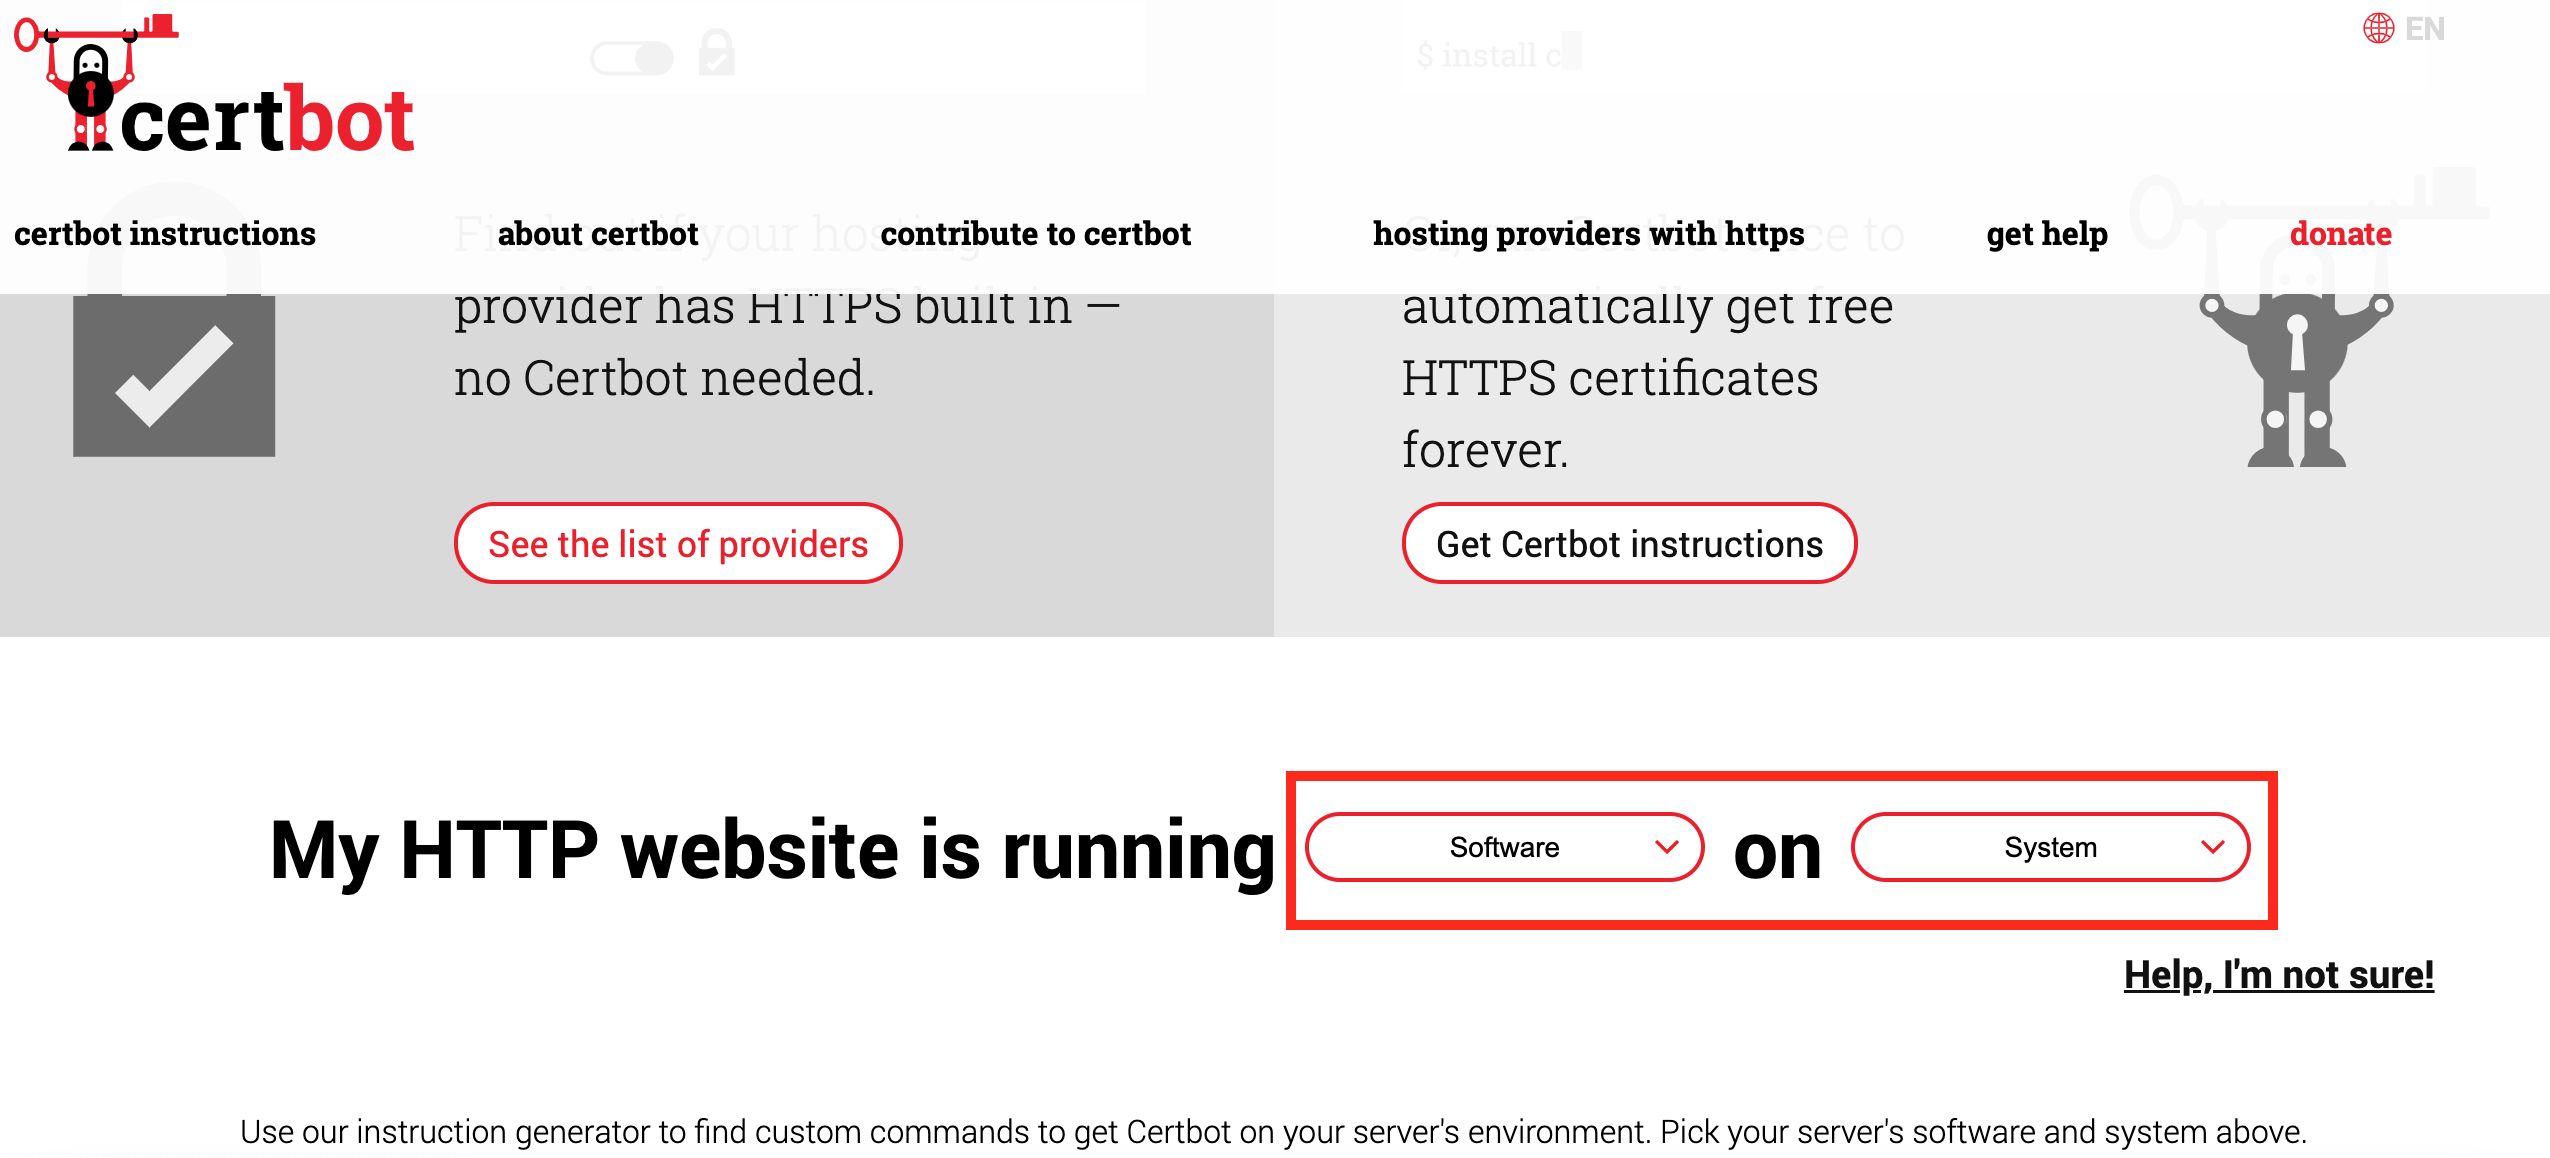
以下範例是選擇 My HTTP website is running Nginx on Pip,使用 dnf 套件管理器安裝。
.ebextensions/00_install_certbot.config
container_commands:
  00_install_dependencies:
    command: "sudo dnf install -y python3 augeas-libs"
    ignoreErrors: false

  10_remove_certbot:
    command: "sudo dnf remove -y certbot"
    ignoreErrors: true

  20_create_venv:
    command: "sudo python3 -m venv /opt/certbot/"
    ignoreErrors: false

  30_upgrade_pip:
    command: "sudo /opt/certbot/bin/pip install --upgrade pip"
    ignoreErrors: false

  40_install_certbot:
    command: "sudo /opt/certbot/bin/pip install certbot certbot-nginx"
    ignoreErrors: false

  50_create_symlink:
    command: "sudo ln -s /opt/certbot/bin/certbot /usr/bin/certbot"
    ignoreErrors: true
4. 監聽443 port
.ebextensions/01_open_https_port.config

Resources:
  sslSecurityGroupIngress:
    Type: AWS::EC2::SecurityGroupIngress
    Properties:
      GroupId: {"Fn::GetAtt" : ["AWSEBSecurityGroup", "GroupId"]}
      IpProtocol: tcp
      ToPort: 443
      FromPort: 443
      CidrIp: 0.0.0.0/0
5. 讓 Beanstalk 執行 certbot 指令
Beanstalk 建制後要讓 Beanstalk 執行指令可以在 Django 資料夾底下建立 .platform/hooks/postdeploy
Beanstalk 會執行在這底下的檔案,副檔名為 .sh
.platform/hooks/postdeploy/00_get_certificate.sh

#!/usr/bin/env bash

sudo certbot -n -d DOMAIN --nginx --agree-tos --email EMAIL
把 DOMAIN 換成 Beanstalk 給你的網域,如果你還有自己的網域也可一併設定
EMAIL 設定自己的 email
–nginx 是使用 nginx 伺服器
如果使用的是 apache 可以改成 –apache
範例假設要設定兩個 DOMAIN
00_get_certificate.sh 範例

#!/usr/bin/env bash

sudo certbot -n -d abc-env.eb.1.elasticbeanstalk.com -d www.abc.com --nginx --agree-tos --email my_email@gmail.com
6. 開啟 certbot 腳本權限
.ebextensions/02_grant_executable_rights.config

container_commands:
    00_permission_hook:
        command: "chmod +x .platform/hooks/postdeploy/00_get_certificate.sh"
7. 建立證書更新排程
.ebextensions/03_renew_ssl_certificate_cron_job.config

container_commands:
    10_create_cert_crontab:
        command: echo "0 1,13 * * * root certbot renew --no-self-upgrade" > /etc/cron.d/mycron
網域名稱太長問題
我把 elastic beanstalk environment 網域,類似 *.elasticbeanstalk.com 網域也設定在 certbot -d DOMAIN 裡面
部屬的時候發生錯誤
nginx: [emerg] could not build server_names_hash, you should increase server_names_hash_bucket_size: 64
解決辦法是在專案資料夾底下建立 nginx 配置檔,設定 server_names_hash_bucket_size
.platform/nginx/conf.d/nginx.conf

server_names_hash_bucket_size 128;
設定完之後就可以正常了,但是我每次切換平台時就會發生錯誤,其中有一個錯誤是
nginx: [emerg] “server_names_hash_bucket_size” directive is duplicate
關於這個錯誤,我在網路上沒有找到適當的解決辦法,只有找到一個網友提供一個辦法
- 先刪掉 server_names_hash_bucket_size 然後部署
- 接著再加回 server_names_hash_bucket_size 然後部署
手動更新 certbot 憑證
注意:以下操作指令需使用 sudo 權限
如果憑證很久沒有被更新,原因是 nginx: [emerg] “server_names_hash_bucket_size” directive is duplicate 的錯誤,你可以 連線到 Beanstalk 虛擬機 手動刪除
.platform/nginx/conf.d/nginx.conf
server_names_hash_bucket_size 128;
然後在下面指示的檔案加入 server_names_hash_bucket_size
.platform/nginx/nginx.conf
// 略
http {
    // 略
    server_names_hash_bucket_size 128;
    // 略
}
// 略
然後執行 sudo certbot renew --no-self-upgrade
切換平台發生錯誤
切換平台會發生 bind() to 0.0.0.0:80 failed (98: address already in use) 錯誤
目前我還不知道為什麼會發生,暫時的解決辦法是先中止 Elastic Beanstalk 實例的 EC2
然後再重新部署 Elastic Beanstalk
參考
How to get a SSL certificate running in AWS Elastic Beanstalk using Certbot
certbot with nginx fails if directives are already defined
certbot User Guide
一杯咖啡的力量,勝過千言萬語的感謝。
支持我一杯咖啡,讓我繼續創作優質內容,與您分享更多知識與樂趣!